Overview
We find difficulties to change Cyberpanel PHPMyAdmin password as well as for the whole environment like Cyberpanel console and Openlitespeed Webserver. If we do any mistake, we may face errors like “Cannot create database. Error message: 0″ or “Installation failed. Error message: ‘int’ object is not iterable [404]”. So, avoiding these above errors, I will show you how to change the password for Cyberpanel and its component and also provide a tip to secure your environment.
No doubt Cyberpanel is a Powerful tool to host your website with zero cost, which means you don’t need any license as It is opensource. I have already tried many Free Hosting panels like VestaCP and others. But my personnel favorite tool is Cyberpanel as it provided so many premium features, which you may lack this useful option in other free Web Control Panel. Not only this, but It also provides one-click install of WordPress, Joomla, Prestashop, and others, which help you deploy your website in a second.
If you are tired of searching for Free web hosting with WordPress, then you are on the right page. Please check out the below post to get a free server and steps to install Cyberpanel.
[su_button url=”https://computemag.com/the-free-hosting-solution-step-by-step-installing-cyberpanel/” target=”blank” style=”flat” size=”6″ center=”yes”]Step by Step installing of Cyberpanel in Google Cloud | The Free Hosting Solution[/su_button]
So after installing Cyberpanel, below questions occurs in our mind and don’t find proper steps to do,
- How to change Cyberpanel Web console Admin Password?
- How to change Cyberpanel PHPMyAdmin Password ?
- Finally, How to Change OpenliteSpeed Webserver Password?
Password is a very essential part to secure Cyberpanel console and it’s components. We will proceed one by one and see the steps.
||Step-1|| Change Cyberpanel Webconsole ADMIN Password
It is a very simple step, but remember set a minimum of 32 Character passwords to secure your environment. There are so many tools to generate a complex password, my favorite is Secure Password Generator tools (consider as a tip), use this tool to generate a strong password.

[su_button url=”https://passwordsgenerator.net/” target=”blank” style=”flat” size=”6″ center=”yes”]Secure Password Generator[/su_button]
After generating a secure password, go to Cyberpanel console and head to User Name showing beside the arrow. Please check the screenshot below,
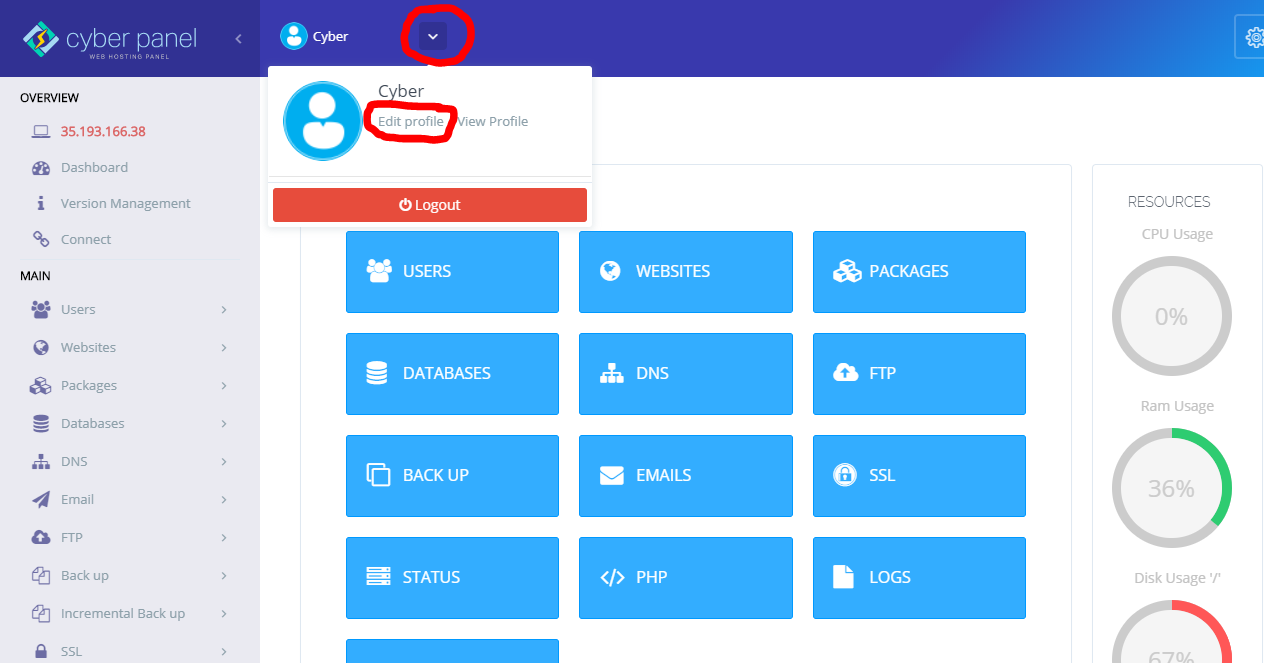
Then Click on “Edit Profile” and choose user in “Select Account” .
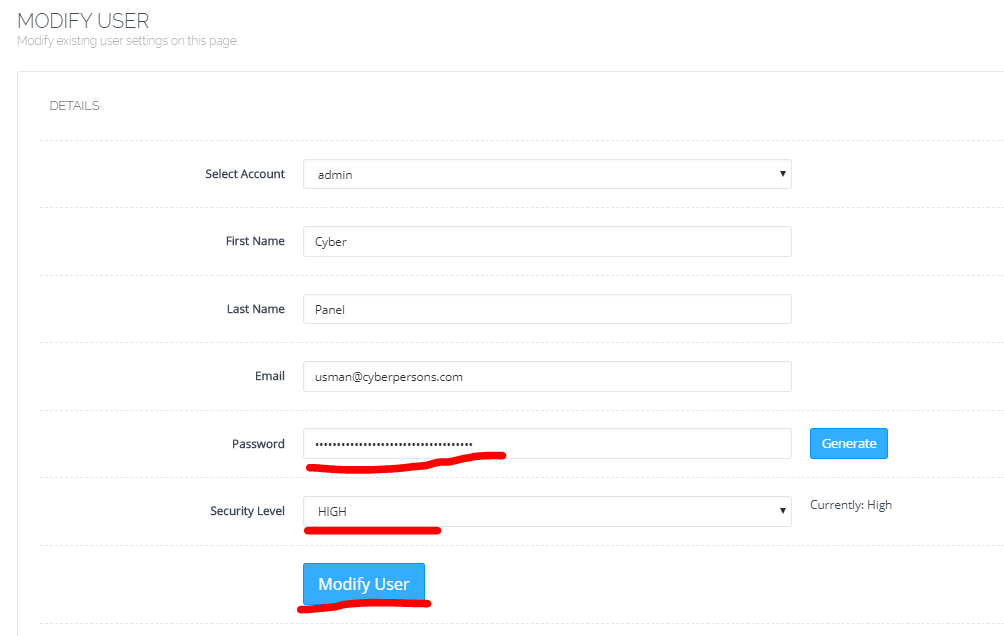
Now, Provide your password ( make secure as possible ) and choose High in “Security Level”. Now we have successfully changed the Cyberpanel Console password.
||Step-2|| Change Cyberpanel PHPMyAdmin Password
Now, We will change Cyberpanel PHPMyadmin Password which is a bit complex and we may face critical error if we don’t follow the proper steps mentioned below.
Important Highlight! If we change the password of PHPMyadmin without any guide or in the wrong method, then we may face below critical issue,
- Cannot create database. Error message: 0 (While Creating Database in Cyberpanel Console)
- Installation failed. Error message: ‘int’ object is not iterable [404] (While installing WordPress or other CMS)
![Installation failed. Error message: 'int' object is not iterable [404] cyberpane](https://computemag.com/wp-content/uploads/2020/05/Installation-failed-Error-message-int-object-is-not-iterable-404-Cyberpanel.png)
If you have found this above error in your console, then not to worry ! you are on the right page. So now please follow the below steps to change the Cyberpanel PHPMyadmin password. Now first go to PHPMyAdmin panel using this URL: https://IPaddress:8090/phpmyadmin/
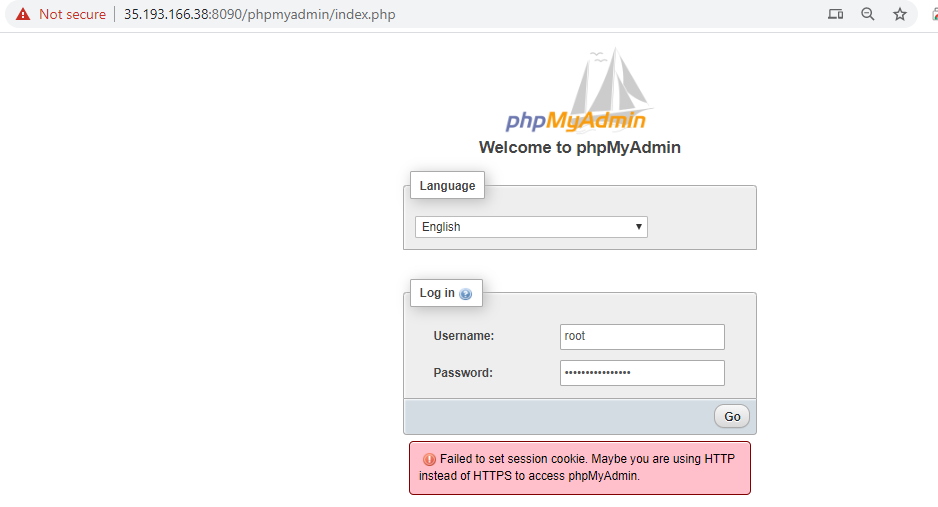
Provide your old username and password login into PHPMyAdmin panel. If you have confusion that How to get login credentials for Cyberpanel PHPMyAdmin then check out the below post.
Now, you have logged in to Panel, then click on “User accounts”.
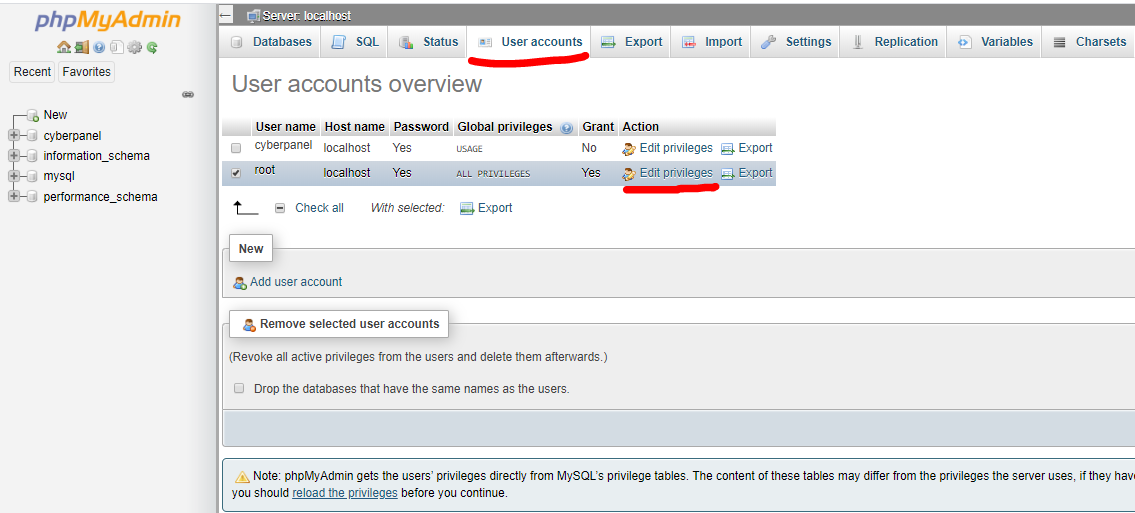
Then you will find the user list and you need to select the “root” user to change the password as marked in the picture. Next, click on “Edit privileges”.
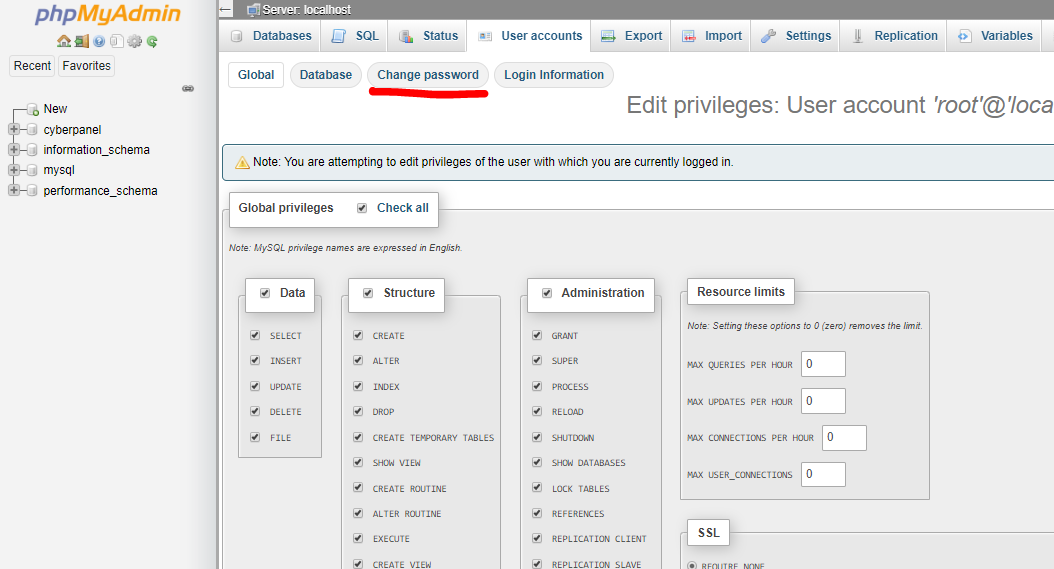
Then, Click on “Change password”. Remember don’t forget to provide a super-strong password for the root user, If you can remember I have provided the link to generate a strong password, you can use the same tool to make a strong password.
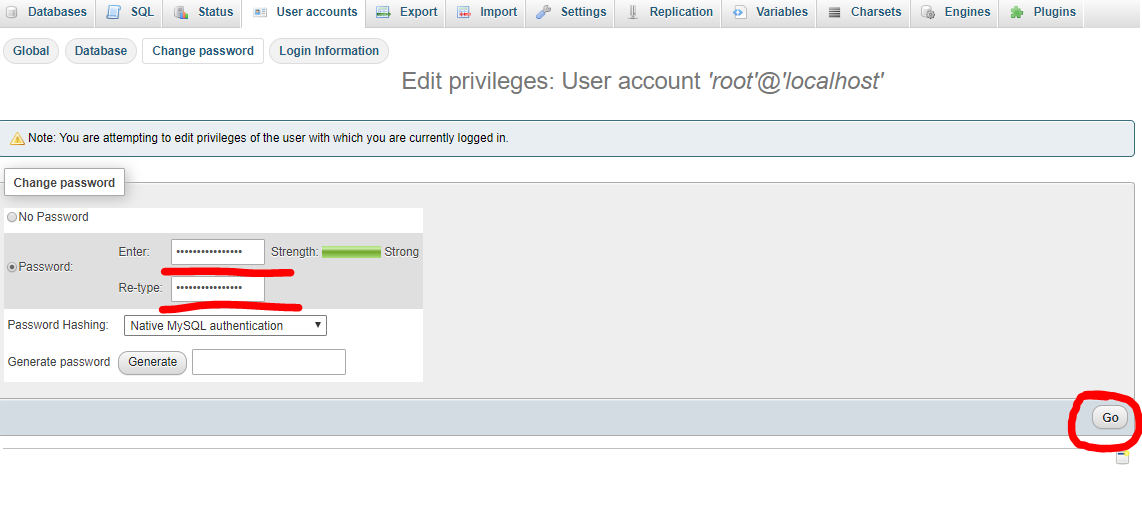 Now, Provide a new password twice and click on “Go”.
Wait! the steps are not completed yet, Be patient and follow the next steps to avoid any type of error mentioned above. Actually when we change the root user password of PHPMyAdmin, very next step is telling the password to Cyberpanel system to use updated password for creating database and WordPress installation.
For this reason, we face the error message. I struggled a lot to resolve this error in earlier days and that time there is no proper guide or any explanation. So, I don’t want you to face the same.
Now login to SSH console of the Cyberpanel system. If you have confusion that accessing Linux VM through SSH in Google Cloud, then follow the guide below,
After getting into SSH console we need to run 3 below commands and edit the respective files and update the root user password of PHPMyadmin in Cyberpanel backend.
- sudo nano /usr/local/CyberCP/CyberCP/settings.py
- sudo nano /home/cyberpanel/.my.cnf
- sudo nano /etc/cyberpanel/mysqlPassword
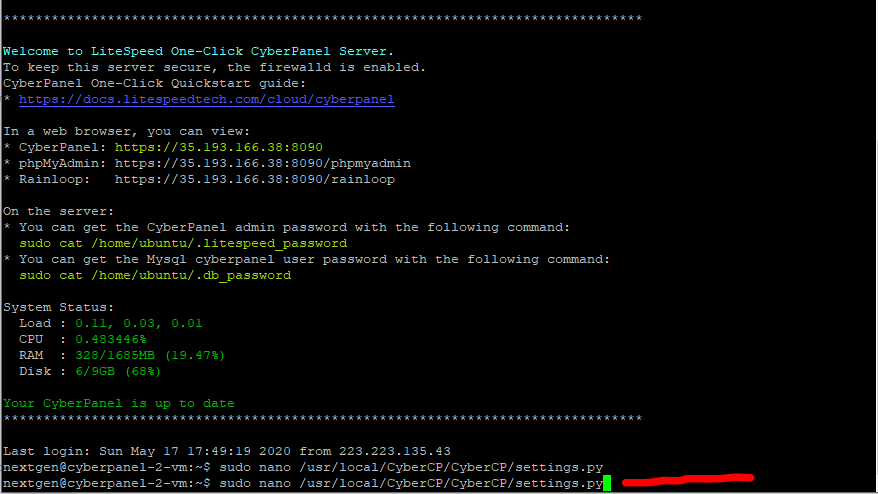
Run Command sudo nano /usr/local/CyberCP/CyberCP/settings.py
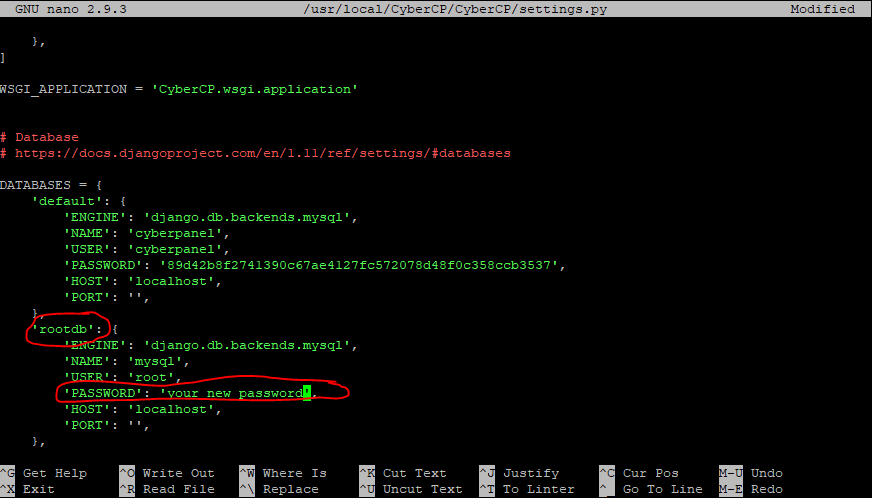
Scroll Down and find the above section, then only change the password of root user as shown above and strictly don’t touch anything. Next click ctrl+O then hit Enter and ctrl+X finally.
then run second command sudo nano /home/cyberpanel/.my.cnf
Sometimes it doesn’t contain anything in the file, if you will find any old password then change it or exit from the console by hitting ctrl+O.
The run final command sudo nano /etc/cyberpanel/mysqlPassword

And, delete the old password and update the new one then click ctrl+O -> Enter -> ctrl+X .
||Step-3|| Change Cyberpanel Openlitespeed Webserver Password
For securing the whole environment, we need to set a strong password after Openlitespeed installation through Cyberpanel. So there is an easy process to change password only we need to allow the port of OLS in Cyberpanel. If you have confusion to access Openlitespeed in cyberpanel, Please check out the below post.
Now login to Openlitespeed webserver with this URL: https://IPaddress:7080
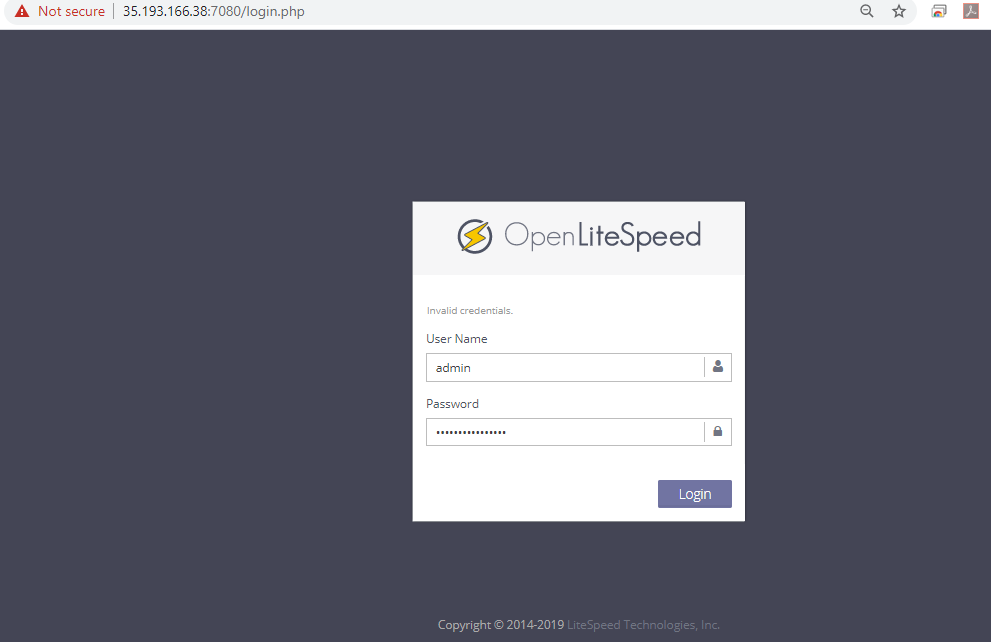
Now Choose “WebAdmin Setting” then “General” from sub-tab and click on “Users”. Now you can change the password here. Again I am reminding you to provide a strong password.
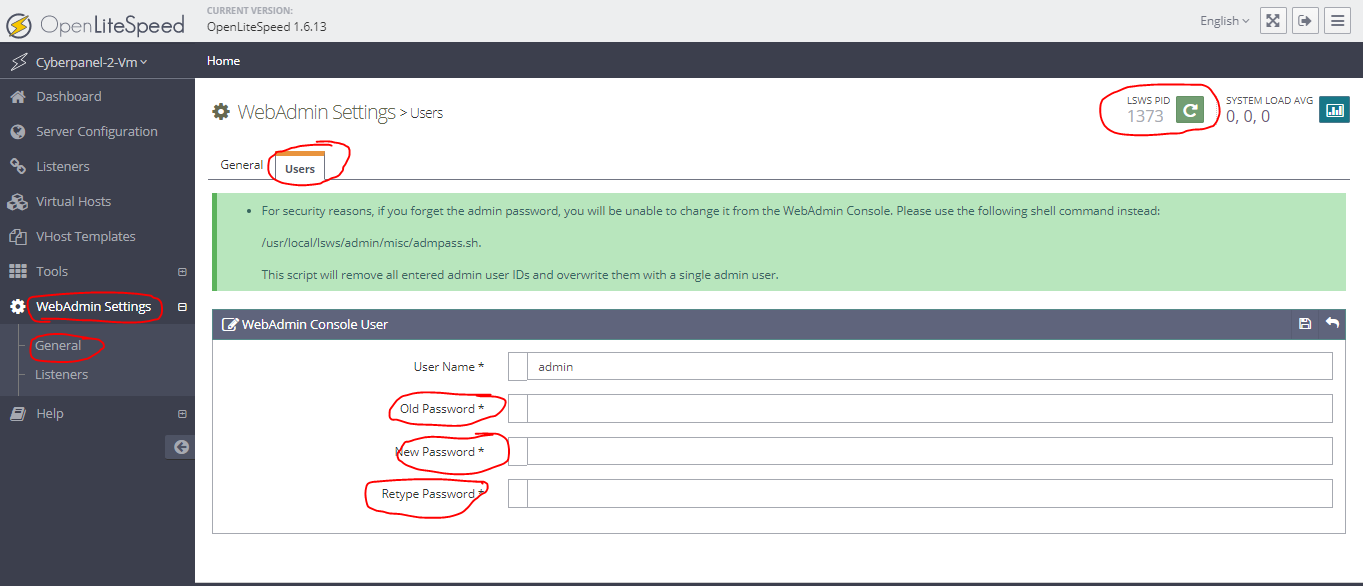
Finally, hit restart and OLS will be restarted.
Now, you have successfully changed the password for Cyberpanel Environment.
Some Important Post regarding Cyberpanel,
- Step by Step installing of Cyberpanel in Google Cloud | The Free Hosting Solution
- How to Secure Cyberpanel and PHPMyAdmin in Google Cloud – The Full Guide
- How to access Linux VM through SSH in Google Cloud?
- How to access Linux VM through SSH Securely in Google Cloud?
- How to access Openlitespeed Webserver Panel Securely in Google Cloud/ Azure /AWS ?

It helped me a lot to resolve the error “installation failed. Error message: ‘int’ object is not iterable [404]” while installing WordPress in CyberPanel. There is no proper guide For this,But I am blessed that I have found this post finally and help me to resolve the error.
Can please suggest how to secure Cyberpanel environment in any cloud provider?
Please visit for best Cloud Solution
Hello Stanley,
Thanks for your suggestion,I am preparing the article where I have mentioned the implementation of deep security in Cyberpanel environment.
Do visit again 😊
very helpfull Chidananda, thanks you for solved this
Thanks Carlos, Do visit again 😊
it’s not working with me if u can help me it will be great
pls talk to me here 00970598575273
Connect me over Linkedln